


Even before the attic was insulated the subcontractors noticed how
tight and energy efficient the “shell” was compared to a traditional stick
built home. During the winter months
they used a large propane heater to warm the working space. They kept it on the lowest heat output at
first, but it soon became clear that even this amount of heat was too much for
a house as efficient as ours, and so turned off the heater. The pilot light continued to burn and that
was enough heat to keep the house warm enough for the work crew. On sunny days it actually got too warm inside
the house for most of the crew.


Knowing how energy efficient the house was going to be, we
chose the smallest advanced wood burning fireplace. We have been extremely pleased with the BIS
Nova fireplace, and we now have had two months of experiencing why, in Europe
first, and finally now in America, they call homes like ours “houses that can
be heated with candles.” The Geothermal
forced-air furnace never runs when the fireplace is in use and the upstairs
maintains a constant temperature somewhere in the range of 65-70 degrees Fahrenheit. When we installed the B-vent for the
fireplace we ran another run of B-vent in the same chase for a small soap-stone
free standing woodstove in the basement.
We have not purchased the woodstove yet, because we want to monitor how
the house performs with just the fireplace and the furnace fan circulating
air. So far it does pretty well, but the
downstairs zone of the furnace does run occasionally, even when the fireplace upstairs
is in operation. When we install the
soap stone woodstove, I am very confident that the furnace will not run since
the downstairs will be heated first and then the heat will of course rise up
the open stairwell to the main level.


By the end of February, all of the rough
electrical and dry-walling and priming had been finished by the subcontractors
and Riemco crew. Since there is no empty
space in the exterior walls and there is 3 inches of Styrofoam on either side
of the concrete, all wiring in the exterior walls is pressed into the foam of
the insulated concrete foam forms. Then the drywall is
attached to the insulated concrete forms by screwing into the plastic “ribs”
that provide the scaffolding within the blocks.
(The scaffolding just connects the inner and the outer foam “walls” of
the blocks). In locations where there is
a need to attach a built-in to an exterior wall it is very helpful to cut out
the drywall and attach plywood or OSB to the plastic ribs so to make it easier
to screw into the wall and not have to “hunt and peck” to try to find the
plastic ribs. After the drywall is
installed, it is necessary to drill into the concrete to attach anything of
significant weight in locations where you do not know where the plastic “ribs”
are.


In locations where there is a need to attach a built-in to an exterior wall it is very helpful to cut out the drywall and attach plywood or OSB to the plastic ribs so to make it easier to screw into the wall and not have to “hunt and peck” to try to find the plastic ribs. After the drywall is installed, it is necessary to drill into the concrete to attach anything of significant weight in locations where you do not know where the plastic “ribs” are.
 At the same time Riemco subcontractors were adding thermal mass to the
outside of the shell which included a combination of the cultured stone
(installed in February) and cement fiber board.
During the evening of sunny days I can really feel the heat radiating
off of the siding.
At the same time Riemco subcontractors were adding thermal mass to the
outside of the shell which included a combination of the cultured stone
(installed in February) and cement fiber board.
During the evening of sunny days I can really feel the heat radiating
off of the siding.


In locations where there is a need to attach a built-in to an exterior wall it is very helpful to cut out the drywall and attach plywood or OSB to the plastic ribs so to make it easier to screw into the wall and not have to “hunt and peck” to try to find the plastic ribs. After the drywall is installed, it is necessary to drill into the concrete to attach anything of significant weight in locations where you do not know where the plastic “ribs” are.


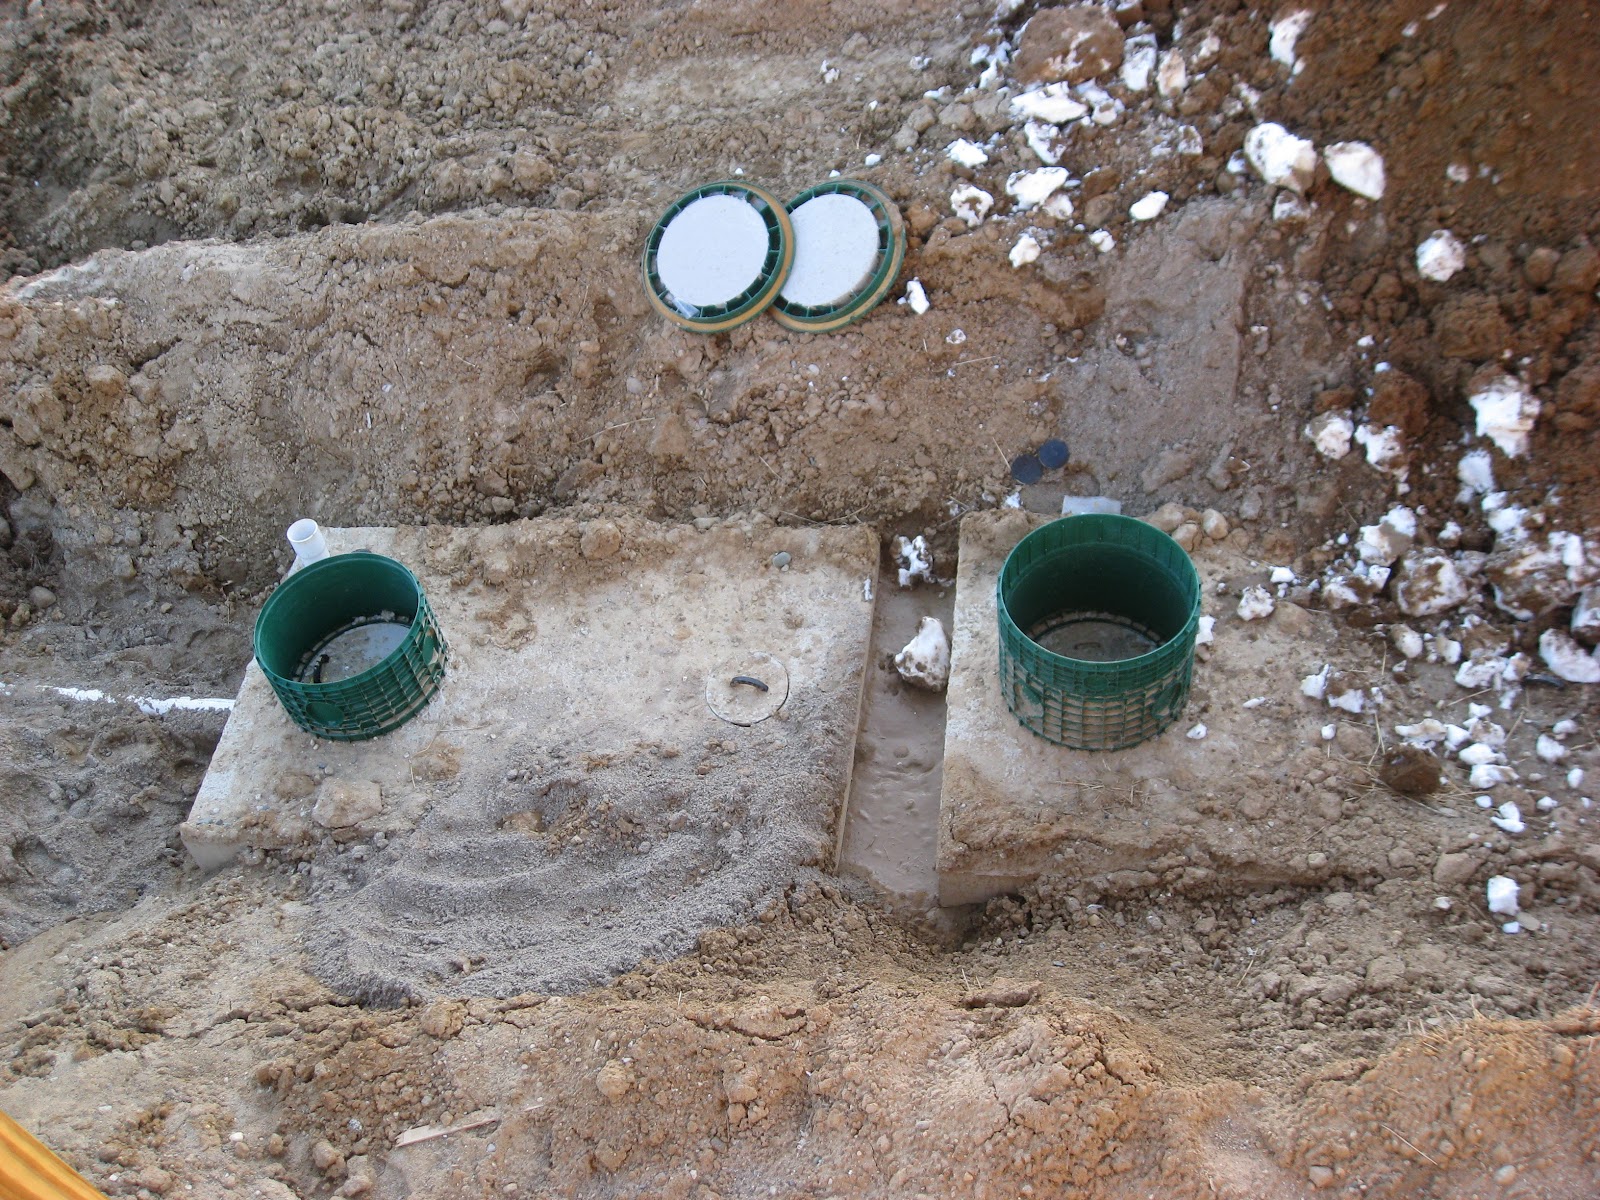
In March as Riemco and the Riemco subcontractors were installing the septic field and tanks, and were finishing up their portion of the construction of the “shell” of the house (including the drywall and priming), we began the part of the construction that we were responsible for. This included shimming & foam sealing & dry-walling around all the windows, tiling the master bathroom, interior painting, interior built-ins, stairs, bamboo flooring, as well as standing and running trim.

Then for about a month in April into May, each evening after work and on
weekends, we tiled the master bathroom using slate on the floor and porcelain
on the walls. Prior to tiling the
shower, a waterproof isolation membrane was painted on the walls and pan. We were fortunate that Mary’s sister Carol
flew out from Los Angeles for several days to work with us to get a large
portion done and to give us lots of expert advice. We were very glad we put so much time and
effort into multiple coatings of sealer on the tiles and cleaning the epoxy
grout from the surface of the tiles. It
turned out beautifully, and it has worked fantastically.


Over the next month, during May and June, we installed 5/8 inch
thick tongue and groove strand-woven Bamboo flooring in all three of the
bedrooms. Whitney choose a Tiger Strand
pattern, Laura chose “Natural” which is a blonde color, and Mary and I chose
“Carbonized” which is looks like medium-dark stained oak. All of these floorings are three times and
strong as oak. Since Whitney and Laura’s
bedroom floors are in the lower level, we used a special moisture barrier adhesive
over the concrete to install the bamboo.
Although it was very sticky and messy, with proper planning, precise
cutting and layout, it worked very well, and turned out spectacularly.


Also in the Spring, we hired Robin Reilly (Rob’s Remods) to help us
determine additional areas that needed sealing and insulating and to finish the
insulation and drywall around the window “buck-outs,” and to “customize” the
IKEA kitchen cabinets. Robin performed a
blower-door test that creates a vacuum in the house which allowed us to
determine where any air leaks were in the “shell” of the house. We did not find many but we did find that
there were small gaps at the bottom corners of the windows where the
Protecto-Wrap prevented the spray-foam insulation from completely filling the
gaps at those locations. We also found
air leaks where the electrician had drilled holes in the wall caps of the
interior walls to run wiring in the walls.
This was detected at all of the electrical plates on interior walls, so
obviously these holes in the wall caps needed sealing. We did not find any air leaks in any of the
exterior walls.


Robin’s plan and customization of IKEA cabinet boxes was an excellent
and creative idea that allowed us to get great cabinet hardware, and save cost
substantially on the boxes compared to having custom boxes built for the
kitchen. He had done something similar
in his own kitchen. Using the ¾ inch
cherry wood planks we already had, and ¼ inch cherry plywood from the local
lumber company, Robin “skinned” the IKEA boxes so that they look like solid
cherry from the outside. As a
mock-up/practice for the kitchen, we started with the laundry room and mudroom,
where we also installed IKEA door fronts that we purchased. This was the only location in the house where
we used the IKEA door fronts (we made custom door and drawer fronts for all
other cabinets and built-ins). Doing the laundry/mudroom area first allowed us
to make sure we liked what we planned on doing in the kitchen, and gave us a
template from which to work, and get specifications for the doors and drawer
fronts and make jigs to increase the efficiency when it came to working on the
much larger space that the kitchen cabinets would take up. It also allowed us to work out all of the
kinks. The boxes were very easy to
assemble and the Euro-style IKEA hardware with their soft-closers work very
smoothly and are very durable.


In the Spring I planed all of the kiln-dried oak planks down to ¾
inch, then sorted it by size and quality and placed it on a drying rack inside
the house to keep the moisture levels consistent to reduce the wood’s expansion
and contraction. Once again, just like with the Sky-Trac, we were very fortunate
that Riemco came through with a very helpful offer and was so kind and thoughtful to let us use a drying rack
that they had built. It was also great
timing that my Sister Ellen’s family was visiting about the time I had become
tired of all the planing and carrying lumber.
They were very helpful in helping me finish the planing and carrying
lumber inside and stacking it on the dry-rack.


All Summer long from sun-up to after 10 pm every night, and often until midnight or after, I worked doing site management, general contracting, clean-up and set-up, and millwork (cutting, planing, rounding-over, and sanding) all of the standing and running trim. Mary worked every evening sanding and staining. Whitney often helped in the evenings; She spent most of the Summer either cleaning and packing getting ready for the move and prepping our other house for rent or sale. After work [at Geosyntec Consultants (Environmental Engineering)] Mary picked Whitney up and brought me dinner. Laura helped occasionally, but most of the summer she spent helping her grandparents on the farm. Our good friend Max, who is an experienced carpenter built most of the non-kitchen built-ins, and I assisted as needed. We were also very fortunate that Max lent us many great tools to use while he was away building a restaurant in Belize and they continued to be all summer long when Max returned to help us.


About mid-summer we took all of the best ¾ inch cherry planks to B & B Hardwoods to have them glued up and sanded to make 85 door and drawer panels for the kitchen, wet-bar, entertainment center, and master bath vanity and cupboard. In August we picked up the large stack of various oversized panels. Max started cutting, rounding over, sanding and then gluing and screwing rectangular dowels on their backs as reinforcement to prevent bowing of the door panels. Mary and I finished sanded and stained them. Once the doors and drawers fronts were sanded to our liking we hired a finish carpenter that worked for Robin who had experience spraying Ceramethane (a water-based polyurethane that contains finely ground-up ceramics) to create a very hard glossy finish. We set up a “clean zone” in our garage and a large rack system to hang the doors and drawers. Each piece (including all the interior oak room doors) was sprayed three times, and we sanded each item between each spraying and did our best to keep the “clean zone” as dust and insect-free as possible to prevent pooling and dripping of the ceramethane that creates bumps on the surface.


It really started looking like a home over the summer, especially after the subcontractors installed the finish electrical and plumbing and added the railing to the deck with the mission style detail we had chosen. We also had a final official blower-door test to determine the "leakiness" of our house. We achieved a 50 HERS score, and this final blower-door test allowed us to find leaks we had missed which we followed up with additional sealing. We got our certificate of occupancy at the end of August right before the start of school and before Pete went back to teaching.


Undertaking the construction of a new home can be very intimidating right from the start.
ReplyDeleteElectrician Norfolk
The result is beautiful especially the cabinet and bookshelf.
ReplyDelete__________________
hoists and winches
Interesting take on this…I think most people don’t realize that comments are not only a great addition to a blog, but it is also cool when people take an interest in something you’ve written.
ReplyDeleteAnother informative blog… Thank you for sharing it… Best of luck for further endeavor too.
ReplyDeletesustainable construction
ReplyDeleteDesigning and building a house is no small task and if you want a good starting point to see what's involved, this building is a great place to start.keep it up...!
Turned out nice!
ReplyDeleteThe article’s advice on realistic timelines is practical. Firms like Burnette Construction Planning emphasize achievable schedules.
ReplyDelete